Showing posts with label Metallic Melts. Show all posts

Wednesday, 23 October 2019

A Very Tricksy Challenge!

Hello again! My poor blog has been missing a bit of loving lately. I've been too busy with other artsy ventures to have the time to pop in here!

Have you seen the new challenge at More Than Words? We have a choice this month - use the word Trick and/or Treat on your card, tag, ATC or postcard.

We don't do the Halloween thing where I live so I had to think outside the square for this one. At some stage the word "Tricksy" popped into my head and I knew I had to feature Gollum!

Here's my tag:


I really had a lot of fun making this. I took an old Kaisercraft packaging piece and trimmed it to size. I used my Gelli plate to make the background and could have stopped there, it was so gorgeous. I added gold stamping and some cool stencilling using two-toned metallic paint. I coated all my chippies with Tinby Designs Metallic Melts. These worked so well! I used different coloured paints underneath two different coloured Metallic Melts to get coordinating, but different, effects. The chippies are all from The Dusty Attic.


Would you believe the only difficult part of making this tag was cutting the photo! It took five attempts to get those stamp-edges straight - lol.

Will you be able to join in the challenge this month? You only have til the last day of the month so be quick. You can find the details here.


Happy scrappin'!


Heather

Tuesday, 8 October 2019

Opening Doors at Kraft+

Hello and welcome back to my blog! Have you seen the new challenge over at Kraft+ yet? There is an awesome photo to be inspired by!

I made this:


I swiped metallic paint behind the photo with a serrated tool from Michelle Grant Designs. This highlighted the corrugated iron wall in the photo.

I added inks plus Tinby Designs Metallic Melts to the scroll under the photo for a rusty, aged look.


To make the shutters, I die-cut them then treated them the same as the chippie above to match the rusty shutters in the photo.


I layered flowers, gems and die-cut pieces.


Here's the image to inspire you at Kraft+. I hope you can join us! You can find more details here.


Happy scrappin'!


Heather

Friday, 19 October 2018

Petticoats and Pleats

Hello there!

I got a bit excited when I saw the challenge over at 13arts. The challenge board is called 'Petticoats and Pleats' and is all about retro dressmaking. When I was young, my mum made most of my clothes. I have some gorgeous photos of me all dressed up in mum's finest creations, but my favourite photo is this one. I must have been two or three years old. I was clearly absolutely delighted with this fantasy of tulle, judging my the look on my face. I was 'All Smiles'.


My journaling at the bottom explains how I must have felt like a fairy princess.

I used papers from 13arts' stunning new Aqua Flora range plus bits and pieces from an older range. I lightly gessoed over the Shades of Black paper, allowing the numbers to peep through in places. On top of that I layered up Tinby Designs Colour Crush, Lindy's Magicals and a variety of stamps.


I coated most of my Dusty Attic chippies with silver Metallic Melts, again from Tinby Designs. I love this chunky, shiny effect. Very glam but a bit rugged at the same time ;)


I mixed some Colour Crush and Magicals with water to make watercolours and painted my butterflies with them so they coordinated with the rest of the layout.


Obviously, my main inspiration from the challenge board was the overall theme of vintage, hand-made clothes but I also used machine stitching, loose thread and an old photo. I hung a round chippie from the photo cluster.


I hope you can join in at 13arts. Here's the challenge board. You can find the details here.


Thanks for taking the time to have a look. I had such fun making this!


Happy scrappin'!

Heather

Monday, 13 February 2017

Enchanted Beauty

Hello to my bloggy friends. I'm back today with another layout using the O-M-G-I'm-in-love new kit from Scrappy Chat Designs. In case you missed my last post, I absolutely adore the Lucky Charm kit! There are gorgeous Prima papers with dusky pinks and stunning metallics plus custom-made Colour Crush and Metallic Melts plus loads of other goodies. Yum!


How cool is that retro Vespa! I just had to use this pic with these amazing papers!


Scrappy Chat members will receive a Tech Sheet with step-by-step instructions showing how to make this page.

Are you a Scrappy Chat member yet? If not, here are the details:
Joining Scrappy Chat Designs is like doing 3 classes each month - all in the comfort of your own home!

Each premier kit comes with:
  • Videos and full instructions to complete the three featured layouts while showing you many techniques with products that you can use well after the life of the kit. (With all of our kits you will receive plenty of product and knowledge that you can apply to future projects.)
  • Photos of each project including close up detailed pictures.
  • All the product needed to complete the projects with a list of additional basic items used such as paints, texture paste or sprays you may need from your supplies.
The kits focus on how to use a range of products and teams them up with sensational papers to compliment them. There are always less- or non-consumable products in our kits that you can use for a long time afterwards.

Kits are $45 + postage and come out monthly. Please e-mail us at orders.scrappychatdesigns@gmail.com if you would like to order this kit.

For more kits and other products visit www.scrappychatdesigns.com.au


Happy scrappin'!


Heather

Thursday, 9 February 2017

Looking Rosy

Hello again. Welcome back!

Have you seen the new Lucky Charm kit from Scrappy Chat Designs yet? OMG! I'm in love! The dusky pinks, the gorgeous coppers and the coordinating Colour Crush and Metallic Melts powders are awesome! It's an incredibly generous kit with ribbon, word stickers, 6 metallic papers, cardstock, drawing ink and more. Wow!

Anyway, enough of my raving - here's my first layout using the kit.


This layout is alive with coppery shimmer and coordinating Metallic Melts shine!


Scrappy Chat members will receive a Tech Sheet with step-by-step instructions showing how to make this page.

Are you a Scrappy Chat member yet? If not, here are the details:
Joining Scrappy Chat Designs is like doing 3 classes each month - all in the comfort of your own home!

Each premier kit comes with:
  • Videos and full instructions to complete the three featured layouts while showing you many techniques with products that you can use well after the life of the kit. (With all of our kits you will receive plenty of product and knowledge that you can apply to future projects.)
  • Photos of each project including close up detailed pictures.
  • All the product needed to complete the projects with a list of additional basic items used such as paints, texture paste or sprays you may need from your supplies.
The kits focus on how to use a range of products and teams them up with sensational papers to compliment them. There are always less- or non-consumable products in our kits that you can use for a long time afterwards.

Kits are $45 + postage Australia wide. Please e-mail us at orders.scrappychatdesigns@gmail.com if you would like to order this kit.

For more kits and other products visit www.scrappychatdesigns.com.au


Happy scrappin'!


Heather

Sunday, 23 October 2016

October Mini Challenge at More Than Words

I love Mini Challenge time at More Than Words! Here's what I made for this month's challenge.


No prizes for guessing what the challenge word is this month! Yep - it's "Boo"! Although this word is often associated with Halloween, we don't celebrate this much where I live, so I chose to put the word to an alternative use and I made this into a birthday tag.


I used metallic paint through my fave Dusty Attic stencil (which you can find here) to create the background. I coated the word in Tinby Designs Metallic Melts for that gorgeous glossy shimmer.


Are you going to join in the challenge this month? Be quick- the challenge runs for one week only!


Happy scrappin'!

Heather

Saturday, 15 October 2016

My Dusty Journal

Hi there and welcome to my blog! I'm back today with another art journal page for The Dusty Attic..


How cool is that stencilling? Dusty Attic's Webbings #2 Stencil is my fave stencil ever! It gives such an awesome textured, mottled effect.

I love using old books as my art journals. I thinly coat the pages with gesso first to allow the text to partially show through in places.


This chippie is also one of my faves. On this page I've coated it with Tinby Designs Metallic Melts then used it to tether my 'heartstrings' to!


I added Mountain Meadow paint randomly through a Circuit Stencil for gorgeous subtle splashes of colour on the background. I placed my journalling along the 'heartstrings'.


I tethered my 'heartstrings' to the tags around the photo of my son.


There's that Mini Heart Button again! There are very few projects that I've made lately where I haven't used this chippie! I've coated this, plus the other chippies, in Metallic Melts again.

The Dusty Attic products I've used are:

Wrought Iron Design Set DA0574

Mini Heart Button DA0682

Heart Attack Panel Small #1 DA1203

Webbings #2 Stencil DA1497

Circuit Stencil DA1322

Dusty in Colour Paint in 
Mountain Meadow DA0916

You can find all these products here.


Happy scrappin'!


Heather 


Saturday, 8 October 2016

Dusty in October

Hello and welcome back! I have an art journal page for The Dusty Attic to share with you today.


All the paint on the background is from The Dusty Attic. I just love the colours!


On the right page I've predominantly used Dusty in Colour Cashmere paint. I adore this colour - it really speaks to me. I've used paint pens to create the journaling and doodling. Doodling is so much fun!


I've coated the Swirly Heart with Tinby Designs Metallic Melts for that cool, grungy finish. Underneath the heart I've used a Dusty Attic butterfly stencil to help create movement across the page. The angular white highlights are created using gesso through a Dusty Attic Crosshatch stencil.

I made this page for the October mood board challenge. There is a $100 Dusty Attic voucher up for grabs! Are you going to give it a go?


The Dusty Attic products I used are:


Twirly Hearts DA0455

Butterflight Stencil DA1493

Crosshatch Stencil DA1475

Dusty in Colour paints in Dusty Pink,
Sugar Plum, Cranberry, Cashmere
and Mountain Meadow.


Happy scrappin'!


Heather


Sunday, 18 September 2016

A Starry Challenge

Hello friends! I thought I'd give a couple of challenges a go this month.

Here's my layout:


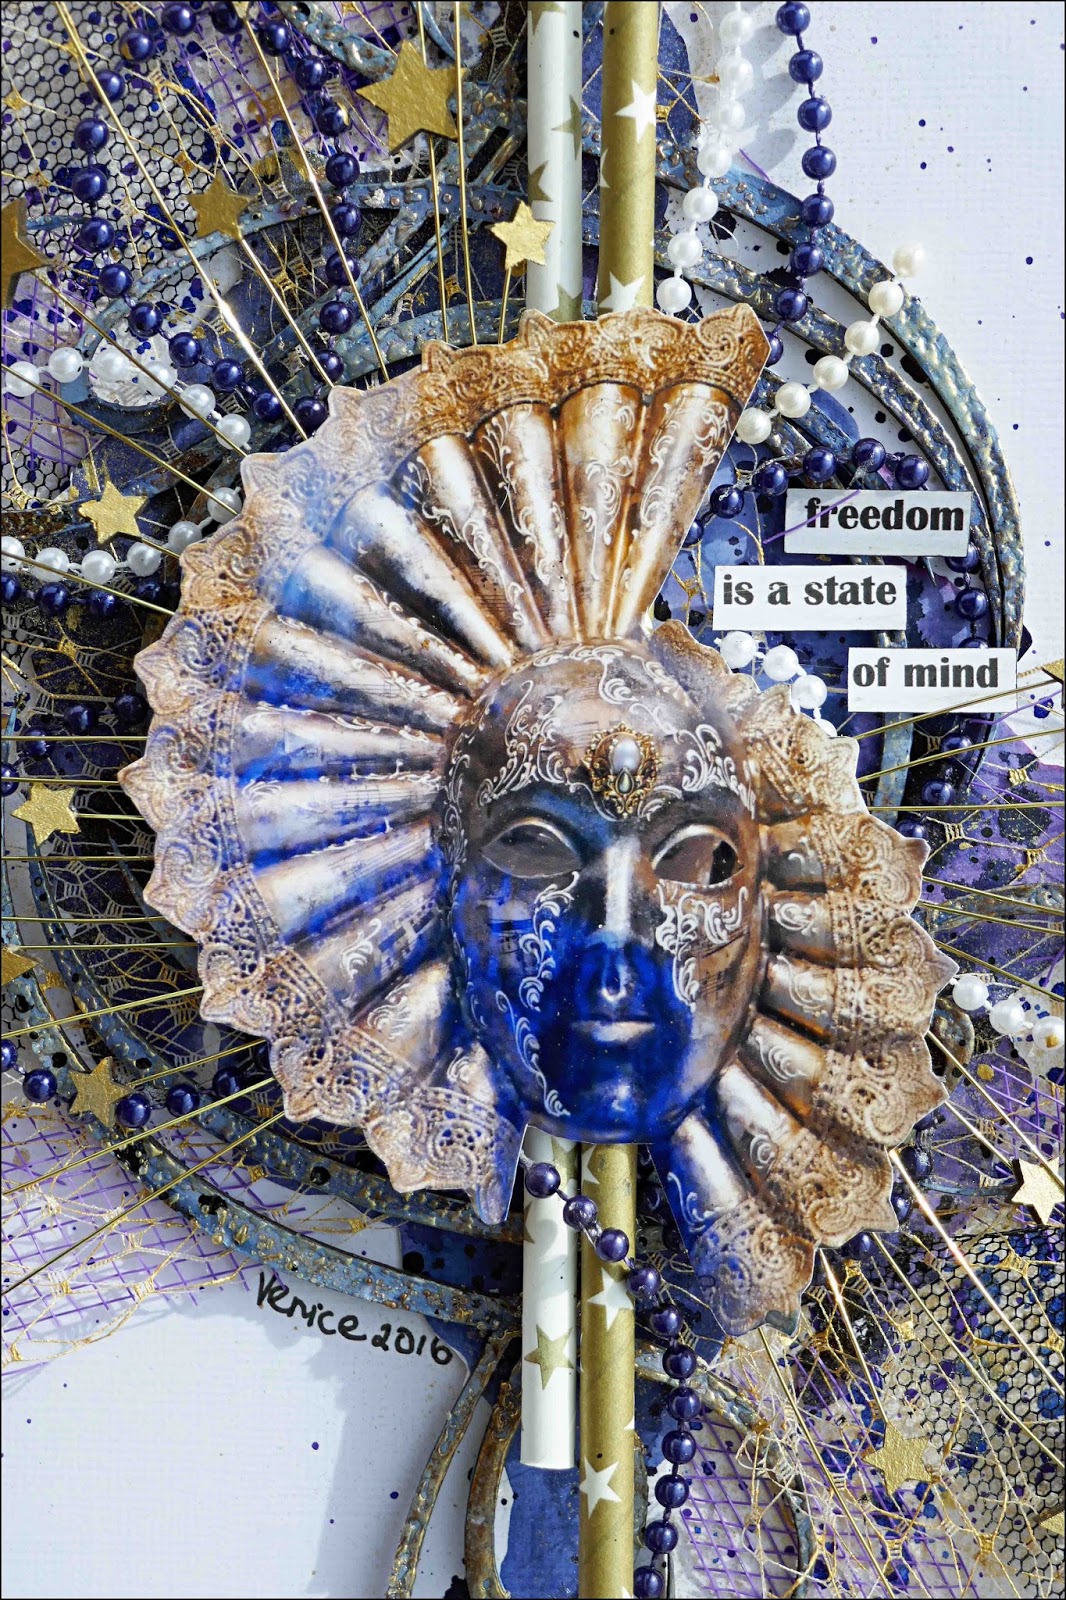
The Venetian mask in the middle of the page is a photo that I cut out. The mask was actually all gold but I took the photo through glass and there was a blue/purple reflection across it somehow which I loved so I picked up these colours on my page.

Right from the start I had this vision of the gold stars radiating our from the ruffles on the mask but it was easier said than done! I painted the Dusty Attic stars gold, then mounted each one on a strand of gold wire. Underneath I layered various types of netting. The diamond-shaped netting on top didn't show up enough so I hand painted each strand gold. Sometimes I think I'm mad!


The background is made with Tinby Designs Colour Crush and a lot of paint flicking. I painted the gorgeous Dusty Attic Swirly Frame with Colour Crush then gave it a grungy, antique finish with gold and bronze Tinby Designs Metallic Melts. 

The title is from a 7 Dots word sticker pack. I wanted the layout to have more meaning than just showing a picture of a mask. This title was perfect!


Why don't you give the challenges a go? At Scrapki-Wyzwaniowo the challenge is Stars and you can find it here.....


At Berry71Bleu the challenge is to use the sketch and add something blue. You can find the challenge here.


At Sandee and Amelie the challenge is Steampunk/Industrial Anything Goes. You can find the details here.


Happy scrappin'!


Heather