Showing posts with label Wild & Free. Show all posts

Tuesday, 7 October 2014

Scrap The Music

Hi there,

Gosh, I've been busy lately and just haven't had time to get to my poor blog. I've got so much scrappy stuff going on at the moment!

I can't share too much now but what I can share are some layouts that I made for one of my Workshop Secrets articles in Scrapbooking Memories magazine. My article was about how to take the best photos possible at music events and how to scrap them. It's often difficult to get great photos at these events so scrapping them can sometimes be a challenge.

Here's what I made:


I used bright colours in this to make the dark photo pop. Most of the products on this layout came from the lovely Katherine at Scrap Everything.

Some close ups:


And here's my second layout:


I made the 'spotlights' by spraying a white mist through a stencil and spraying it heavier towards the centre so it fades out at the edges.


Thanks for looking :)

Happy scrappin'!

Heather

Wednesday, 30 April 2014

Ewww! A Doggy Kiss!

Hi there!

I have a layout to show you that I made a little while ago using Glitz Design's Wild & Free papers for Scrap Everything. This is such a distinctive range and I absolutely love it! It comes with letters, stickers and heaps of interesting features that can be cut out and added to your page. All I added to this was a few bits and pieces I had lying around.

Here's my page:


My niece Maddy was obviously torn between smiling for the camera and going "Ewwww!"!

The Wild & Free papers have a very American Indian feel to them so I continued this with my theme of arrows. I decorated a wooden skewer with mists and beads and added chevrons and feathers at the ends.


I cut the paper beneath the photo to represent Indian fringing and continued the arrows, beads and feathers throughout the layout.


Happy Scrappin'!
Heather


Thursday, 13 March 2014

Sweet Dreams

Hi everyone. I'm here to share my third layout using the Soaking It Up kit from Scrappy Chat Designs. I used the dreamcatcher as the inspiration for this layout. And with all the lovely pink girliness available on the sticker sheet I couldn't resist using a photo of my niece fast asleep.


I added some feathers from the sticker sheet to the dreamcatcher and made it look like they were wafting down. I love all the arrows and chevron shapes on the sticker sheet too. They can be used on just about any layout.


To make the over sized chevrons, I cut part of a large zig zag shape to a chevron then cut the chevron into three long, skinny ones. I also used the sheets of washi in the simplest way by just tearing strips off. This suited this layout but there are so many other ways you could use this.

Well I have loved working with this kit. There are so many extras that are such fun to play with and some, like the stencil, can be used over and over again.

Happy Scrappin'!

Heather

Thursday, 6 March 2014

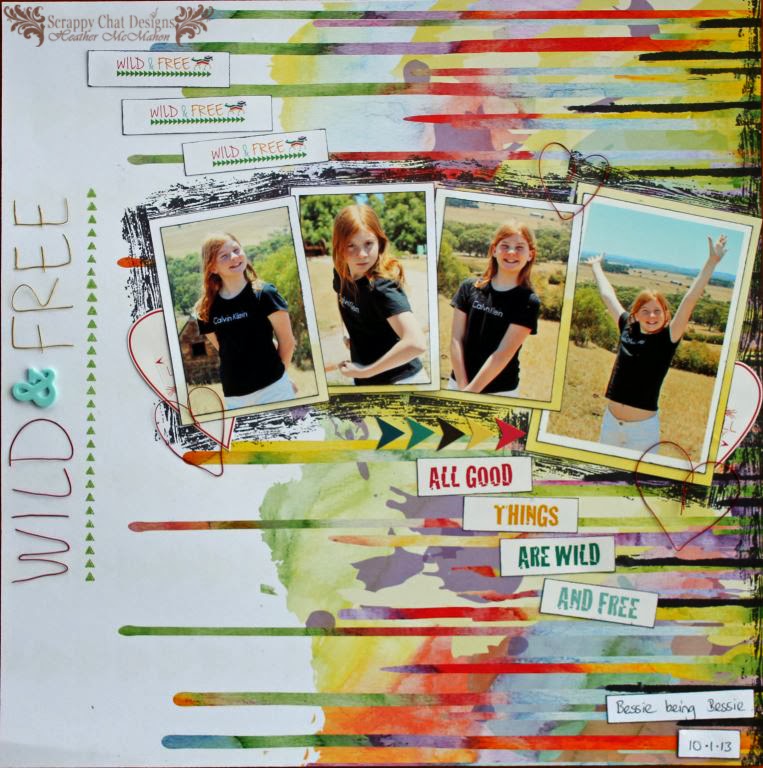
Wild & Free

Hullo there. I hope your week has been a good one so far.

I have my second layouts made using Scrappy Chat Design's new Soaking It Up kit to show you. Some of the papers in this kit are from Glitz Design's Wild & Free range. In my layout, the name of the papers became the name of my layout.


Included with the kit this month is some coloured wire which is fortunate as it's exactly what I needed to make the title. I copied the font and design of the brand name.

Here it is up close. I've put this pic in sideways so it's easier to see.


It was really easy to make the words as the wire is so soft to work with. If you've never worked with wire before then I've put a brief step-by-step on my post on the Scrappy Chat Designs page.

The hardest part is attaching the letters to the page. You'll need to use a clear drying glue with a fine nozzle. It's also an option to stitch or staple it to the page, depending on what your design is and what you're attaching it to.

In the picture below you can see the brand name design. I've added three of them to the page to reiterate the Wild & Free theme. One of the Kaisercraft stamps that are also in the kit was perfect for forming the row of triangles under the name.


I also used the wire to form some hearts and used the heart from the sticker sheet as well. The borders around the photos are made with one of the stamps. I just inked up only the parts of the stamp that I wanted to use and carefully stamped around my photos. If I was only using one photo I would have done my stamping before I adhered the photos to the page but this was a bit tricky with four photos.


I used a third stamp, again one of the ones in the kit, to create the black drip marks on the right of the page. I wanted to accentuate the look of the page fading from dark to light as you look across the page. I used the wood grain stamp to add a black border to the right hand side then I took the drippy stamp, inked it in black ink, than applied it at random spaces and lengths along that edge. This gave the effect of more paint drips adding to what was already on the paper.

I love this 'drippy' paper and wanted to show it off. It's also quite a busy paper so I kept my embellishments to a minimum to allow the paper to shine.

Thanks for joining me.

Happy Scrappin'!
Heather

Thursday, 27 February 2014

Wild & Free

Hi all. I've been playing with the new Soaking It Up kit from Scrappy Chat Designs. Wow! I love this kit! It has papers from the stunning Wild & Free range along with coloured wire, a stencil, sequins and a new Metallic Melt made especially for this kit. Plus the most wonderful set of stamps ever! I used all four stamps on my first two layouts and I will be using these HEAPS in the future.

I'm the lucky one who gets to make three layouts with the kit this month so here is my first one:


This page was lots of fun to make. To start, I laid the stencil over the background cardstock and sprayed it with acrylic paint mixed with water. I used Dusty in Colour paint but any water-based paint will do. I moved the stencil around the page to spray the areas I wanted and  covered the areas I didn't want sprayed. I then selected random stenciled shapes, place the stencil back over them and applied Versa Mark ink in one section only. I then sprinkled over some Metallic Melts, removed the stencil and melted them. I used Lagoon Metallic Melts here as the one in the kit didn't suit this page. This was a great way to add some interest and texture to the page.

Here's a close up:


I then started stitching those crazy circles. I placed a sheet of paper on the page then just stitched the circles on. I didn't measure anything. I'm too impatient for that! For the solid circles, I stitched a single circle then carefully ripped the paper away from it. For the hollow circles I stitched two circles, one just inside the other, then tore away the paper from the outside and inside. I overlapped them fairly randomly and added a few hand-stitched crosses to some areas. I very rarely hand stitch so I was really pleased that this gave exactly the result I was after.

I used one of the stamps around the edges of the page and the photo then heavily inked the edges. I love this look! I used the triangle shapes from the sticker sheet to make a banner and simply added cotton for the banner 'string'. The sequins were a great touch - I'm so glad they were in the kit. They are so simple yet effective.

Some more close-ups:


This kit is available for $39 plus postage to anywhere in Australia. Email orders.scrappychatdesigns@gmail.com

Remember all kits come with three videos to teach you various techniques and how to complete the pages created by Beck if you wish. Or if you like my takes on the kit, you can go that way as well!  

Happy Scrappin'!
Heather

Friday, 8 November 2013

Wild and Free with Scrap Everything

Hullo there.

Today I have a layout to share that I made for Scrap Everything. Katherine sent me the absolutely stunning new range from Glitz Design called Wild and Free. I adore this range! The colours are mostly bright and happy but there are also some softer colours that make fantastic background papers. Take a look at the range here.

My layout today is about this gorgeous place we stayed at in Crete a couple of years ago. It oozed charm and character. The window in the photo is one of the windows in our little pension. It was so picturesque!


That background paper is very easy to work with. That watercolour effect is so versatile - this would go with just about any theme. I flicked a bit of Dylusions ink across the page to add a bit of interest. I also used some prima packaging behind the photo. All the letters, words and shaped stickers are included in the Wild and Free pack.

The large flowers are from a Prima collection and the small ones are Kaisercraft roses, available here. I gave three of them a quick spray with Dylsusions ink spray and they coloured up really well. I used Lemon Zest, available here. Anyone who is a regular follower of my blog would know that I adore Dyslusions sprays. I confess, I'm a Dylusions junkie!

There's also a bit of twine in there. At $1 for 5 metres it's amazing value. I don't know where I'd be without my twine. It's my go-to when I have a gap to fill.

Here are some close-ups:


I hope you can get your hands on these papers cos I think they're stunning!

Happy scrappin'!

Heather