Showing posts with label Cards. Show all posts

Friday, 21 July 2023

A Quick ArtStacks Card

Hi there!

I needed to make a card recently and I couldn't go past the oh-so-cute birds in ArtStacks' "Art & Nature" pack. I adore these little cuties!

I simply wrote "Happy Birthday" multiple times around the edges of the card to cerate a border then added "You old chook" under the picture.


You can find this wonderful pack here.

Happy creating!
Heather


Friday, 20 January 2023

Rude but Funny Cards for ArtStacks!

Hi there! I'm being a bit rude today - I hope I don't offend anyone!

I wanted to use Deb's Weiers' gorgeous Wonky Birds to make some cards. I searched online to see if I could find an appropriate quote and I found one which made me laugh. 

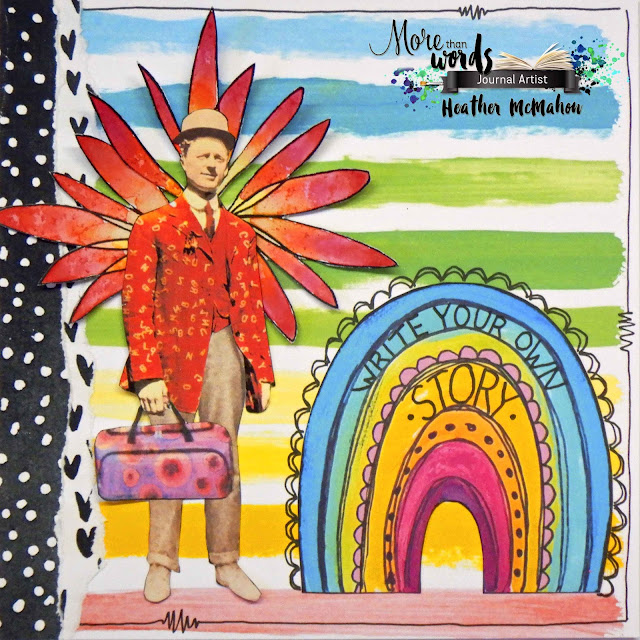
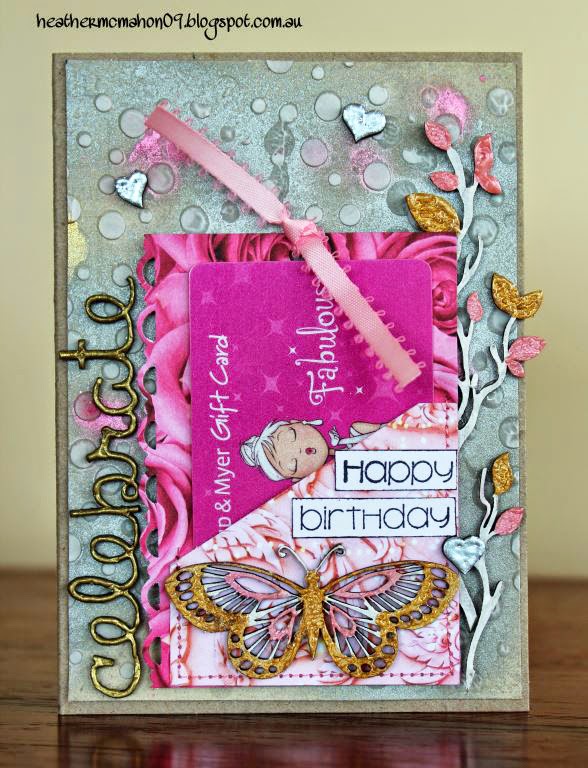
I made three different cards using three different bird images from Deb Weiers' Wonky Critters pack. Without the quote inside, these cards could be given to anyone. I'll add the quote to the inside of cards where I think the recipient will get a laugh.

I made each card a different size and framed each bird in different paper.

And the wording inside is.......

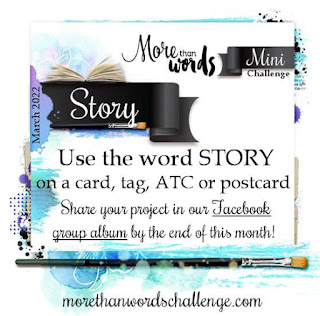
I hope you found this funny! I confess, I didn't make the quote up myself. I found it online. You can see the original here.

There are so many birds on the one page of Deb Weiers' Wonky Critters pack that I realised I could easily make lots of these. I decided to print the wording as this would be quicker. Here's a step-by-step process of how to do this.

Step 1
Print the title on a plain piece of paper.

Step 2
Cut a piece of cardstock to size and add a line of glue lightly to the top of the cardstock. Glue it over the printed words with the glued edge at the top of the page.

Step 3
If you have a printer with more than one paper feeder, choose the option that lets the paper go through with minimal bending. Put your paper in the correct way, adjusting your printer for different print settings if needed, and print again.

Step 4
Remove the cardstock from the backing paper and you're done!

You can find Deb's amazing papers here.

I hope this brought a smile to your day :)


Happy cardmaking!

Heather

Saturday, 28 May 2022

3 Cards in 3 Steps

Hi there. I forgot to post this one previously! I made these three bright and cheery cards in just three simple steps using rainbows from Lisa Oxley’s Bright & Bold stack.

Card 1

Step 1 – Stamp Happy Birthday sentiment multiple times over the page making one a different colour.
Step 2 – Add one of Lisa’s rainbows.
Step 3 – Draw a border around the card including a small heart.

Card 2

Step 1 – Cut some Hearts paper from Lisa’s Bright & Bold stack to fit the card, ink the edges and adhere to card front.
Step 2 – Add one of Lisa’s rainbows.
Step 3 – Swipe a bit of gesso behind the title, let it dry then adhere a title sticker on top.

Card 3

Step 1 – Add spatters to the background.
Step 2 – Add one of Lisa’s rainbows and journal around the outside of it.
Step 3 – Add a sentiment and doodle a border, including a sun in one corner.

The hearts paper and the rainbows are all from Lisa’s Bright & Bold stack. You can find it here.

I hope you can use these as inspiration to make your own fun cards!

Heather


Thursday, 17 March 2022

Write Your Own Story

Welcome back! The new Mini Challenge at More Than Words is to use the word STORY on your card, tag, ATC or postcard.

I made a card:


I already had the little man sitting on my desk so this card came together so quickly. I just added the background papers from Lisa Oxley's Bright & Bold stack over at ArtStacks. I wrote my title on the rainbow, which is also from Lisa's stack, added a border and I was done!

Will you join the challenge this month? You can find the details here.


Happy creating!
Heather


Wednesday, 27 October 2021

Christmas Card Recipe #2

Welcome back to my series of Christmas card recipes!

For today's cards, I focussed on using just white, kraft and a pop of one colour.


I've written up the recipe, plus costs, on the ArtStacks website. For full instructions click here.

I sure hope you can join in the fun!


Happy cardmakin'!

Heather

Saturday, 16 October 2021

Christmas Card Recipe #1

Welcome back!

I'm running a new series of tutorials called Christmas Card Recipes over the next couple of months. These tutorials will show you how to make cost-effective yet eye-catching Christmas Cards. I give you a list of ingredients (most of which you will have in your stash) plus costs and how to put them together.


This is Christmas Card Recipe #1. The full recipe is available over at ArtStacks so, rather than have me re-write it all here, just head to www.artstacks.com.au/blog/ 

I hope you can join in the fun!


Happy craftin'!

Heather

Sunday, 25 April 2021

An ArtStacks Card for More Than Words

Hello! The new Mini Challenge at More Than Words this month is to use the word IDEAL on your card, tag, ATC or postcard.

We've just released our first ever CardStacks at ArtStacks and, as I was in a hurry to get this card made, I quickly cut a rectangle around one of the featured images to suit the size of my card blank, punched a border then mounted it on coloured paper. I added a sentiment from the CardStacks pack and mounted it onto a card blank and my card was done!

This bunch of flowers is from the Anemones & Friends CardStack. You can find it here.


I hope you can join us at More Than Words this month. You only have until the end of April so be quick! You can find the challenge here.


Happy scrappin!

Heather


Tuesday, 16 June 2020

Hi!

Hi! Hi! Why do I keep saying Hi? Because it's the word you have to use on your mini project this month over at More Than Words ;)

I made a card:


I hope you can join us this month! You can find the challenge here.

Happy scrappin'!


Heather

Tuesday, 23 July 2019

Look!

Welcome back!

The new Mini Challenge word at More Than Words for July is "Look". Use this on a card, tag, ATC or postcard and add it to our Facebook page by the end of the month to be in the running for some very cool prizes. Be quick!

I made a postcard:


I found this quote online and thought it was awesome. There are lots of wings on the postcard - chippie and die-cut ones to match the quote. The stars also tie in with the quote. The silver and pale blue colour scheme is cool, however it was very difficult to photograph and the colours here are not exactly as they are in real life.

I hope you can join us for the challenge. You can find the details here.


Happy scrappin'!


Heather

Sunday, 23 June 2019

It's All About You!

Hi there! I don't know what it's like where you live but it's absolutely freezing here at the moment! Brrrrr.

Have you seen the new Mini Challenge at More Than Words yet? The challenge is to use the word "You" on a card, tag, ATC or postcard.

I made a simple birthday card.


I think this challenge is a great excuse to get some birthday cards made. YOU can enter as many times as YOU like!

You can find the challenge here. Be quick - you only have a week to enter!

Happy scrappin'!


Heather


Friday, 23 November 2018

Shine at More Than Words!

Welcome back!

Firstly, I'd like to send out a big thank you to those of you who follow my blog. Your comments and messages of support on some recent posts means a lot to me. The scrapping community is a very supportive one!

Today I'd like to share a card I made for the mini challenge at More Than Words. The challenge is to use the word 'Shine' on your card, tag, ATC or postcard. I made a card:


This is unusually flowery for me. I just felt like making something in this style. I was inspired to by the realisation that I have heaps of flowers in my stash that I rarely use. Part of the reason I don't use them much is that I don't like bulky layouts as I keep my layouts in albums. A card is the perfect solution to use them up!

I love this colour combo of pink, orange and yellow with kraft. I added bare chipboard and corrugated cardboard in neutral tones too.


Are you going to give our challenge a go this month? You can find the details here.


Happy scrappin'!


Heather

Sunday, 23 September 2018

Shine Bright at More Than Words

Hello there! It's Mini Challenge time over at More Than Words and the word that we need to see on your card, tag, ATC or postcard, is 'Bright'. I made a card:


You know me - if the challenge word is 'bright', I'm not only going to use the word, I'm going to make my project very bright as well. Lol!

I dragged out my old Silks to paint these letters. They have just the right amount of transparency that gave me enough colour but still let me highlight with black pen over the top. I hadn't used them for ages and was horrified to find most of them had dried out but a bit of water on the brush worked well enough.

I hope you can join in the challenge this month. Be quick! You only have until the 30th of September. You can find the challenge here.


Happy scrappin'!


Heather

Wednesday, 21 February 2018

It's All About True Love

It's Mini Challenge time again at More Than Words! As February is tradtionally the month of love, the word that we want to see on your card, tag, ATC or postcard is 'True'.

Here's what I made:


I made this for a very special couple who are getting married. I wish I knew what colours the bridal party will be wearing as I could have co-ordinated the flower but the colours are always a surprise!

Here's the challenge board:

Image may contain: text

You can find the challenge details here. Remember that February is a short month so get your entries in on our Facebook page soon!


Happy scrappin'!


Heather

Saturday, 23 December 2017

And So Say All of Us!

Well I hope your Christmas celebrations are all prepared and that you can spend time with family over the break. I also hope that you can sit back, relax and join in the new Mini Challenge at More Than Words! In keeping with our family theme, the word we want to see on your card, tag or ATC is 'Us'.

I made a card this month:


I thought the wording on this was appropriate as I made it for someone for his birthday with a git that was from a number of people.

The background on this is made with Tinby Designs Colour Crush, overlaid with stitiching and die-cuts. This style of wording is a great way to use up odds and ends of alphas.

I hope you can join in! You can find the mini challenge details here.

Image may contain: text

Happy scrappin'!


Heather

Sunday, 20 December 2015

A Scrappy Chat Designs Card

Hello scrappy friends! Today I have a card to share for Scrappy Chat Designs. Yes, we don't always just make layouts! I've made this card using the absolutely gorgeous Enchanted Garden kit. This kit contains some yummy papers, cardstock, a full-sized stencil, Shimmerz Creameez, funky flowers, twine and more!

Here's my card:


You'll never guess how I made those gold flecks! Head over to the Scrappy Chat Designs blog HERE for a full tutorial and to find out my little secret!


Are you a Scrappy Chat member yet? If not, here are the details:
Joining Scrappy Chat Designs is like doing 3 classes each month - all in the comfort of your own home!

Each premier kit comes with:
Video AND instructions to complete the three layouts and feature many techniques with product to be used well after the life of the kit. (With all of our kits you will have plenty of product and knowledge to add to future projects)
Photos of each project including close up detail pictures.
All the product needed to complete the project with a list of additional basic items used such as ink/ paints/gesso/texture paste and colour sprays you will need out of your supplies.
The kits focus on how to use various products teamed up with some pretty paper to compliment them, so there is always less or non-consumable products in our kits, to not only help you complete some beautiful projects, learn many techniques and ways of using the different product as well as taking them well beyond the kit projects.
Kits are $39 + postage and come out monthly. Please e-mail us at orders.scrappychatdesigns@gmail.com if you would like to order this kit

For more kits and other products visit our website www.scrappychatdesigns.com.au

Scrappy Chat Designs Kit club Membership (e-mail us to purchase):
This lasts for 3 months is $135 and includes 3 kits at 5% off and postage for all 3 kits (they are released monthly). As a member you also get ‘insider’ info on what is coming up in the next kit – sometimes even a pic! You get additional 'Technique sheets' showing you more techniques you can nail with the product in the kit from the talented Arty Chic's. You are also guaranteed the kits which do sometimes sell out VERY quickly. If you are interested in membership, you need to pay the membership fee by the 30th of the month prior.

Just email for this deal orders.scrappychatdesigns@gmail.com 


Happy scrappin'!


Heather

Saturday, 21 November 2015

Gift Cards for Gift Cards!

Hello there! I thought that with Christmas coming up it might be a good idea to re-visit an idea I had earlier in the year about how to present gift cards in a meaningful and attractive way. I've put this post up before so if you've seen it, feel free to move on!

I bought some gift cards to give to some family members and was wondering how I could present them nicely to their recipients. My solution was to create a card that provided both a place to write my sentiments plus a place to hold the gift card.

Here's what I made:


Can you see the gift cards? They're tucked into pockets on the front of the cards.

The darker card was made with a young male in mind, hence the grunginess. I started with a clothing tag as my base for the pocket and stitched a diagonally cut piece of paper onto it to slide the gift card into. The chippie word 'Dude', the barbed wire and the spark plug were all treated with Gelatos and Beck BT's Tinby Designs Metallic Melts in a similar way to that which I described in a previous post here.  Isn't that chippie font so cool?


The background was made using texture paste through a stencil then adding some sprays.

The female card was much harder to make because I already had the gift card and it was hot pink. Eeek! I teamed it up with some stunning Websters Pages paper and kept the embellishments pretty rather than grungy. I love these Dusty Attic titles.


Here are the products I used:

Word Pack #6

Barb Wire #2

Spark Plugs

Stars #3

mini Stars

Word Pack #7

Branch #4 small

Flutterbies #3

mini Hearts #2


I hope this has inspired you to add a personal touch to your gift-voucher giving this year! Don't forget you can buy Dusty Attic products online now here.


Happy scrappin'!


Heather