Showing posts with label Bo Bunny. Show all posts

Monday, 1 September 2014

My First 7 Dots Challenge

Hi there.

I've just got back from a very busy Melbourne Paperific Expo. I was working on the stand for Scrappy Chat Designs and Tinby Designs and we were flat out most of the time. It was fabulous to catch up with old friends and to put faces to the names of a few facebook friends. Of course, I met so many wonderful new ladies as well.

Fortunately, our stand was next to Hobbysew Echuca, who happen to be one of the few Aussie stockists of 7 Dots products. I had been keen to give them a go so Karen very kindly brought some papers down for me. I wasted no time in using them!

I decided to enter the August/September challenge at 7 Dots. The theme is "Five Senses". You can find the challenge here.


My daughter is 19 and is experiencing her first year away from home. She is facing many new situations this year so I decided to go with the title "Listen to your Heart". She has everything in her to make the right choices, all she has to do is listen to what she already knows.


I really enjoyed using the 7 Dots papers. They are thick and strong and take mixed media really well. Before I put my embellishments on top I sat the finished background under a stack of heavy chipboard overnight and my page is now completely flat. I'm very impressed! My background paper is from the Cold Country range and the tags under the photo are from the Nature Walk range.

I've used texture paste through a stencil on the right hand side then sprayed with Heidi Swapp Color Shine. I've added some stamping and some purple ink through a Crafters Workshop stencil.


I've painted my Dusty Attic chipboard with Dusty Attic paints (of course!) and added a splash of purple from my ink pad.
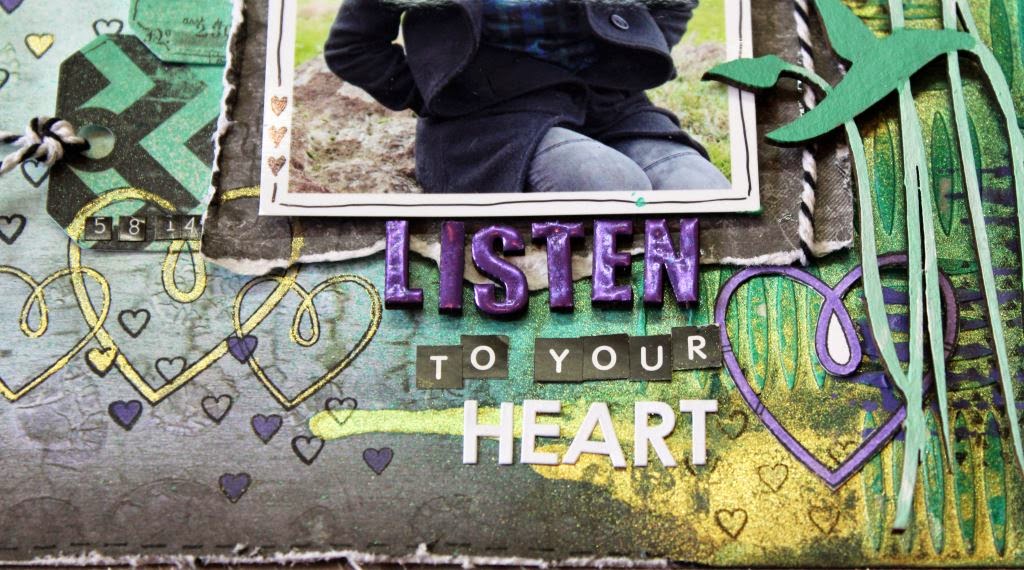

I've used Metallic Melts on my Dusty Attic title and used Color Shine to paint the stamped hearts gold. I used a brush with the purple ink pad to paint the heart on the right which I fussy cut out.


I gave the 7 Dots tags a light spray with the Color Shine to tie them in with the rest of the layout. I adore these little Bo Bunny heart stamps.

I hope you can join in at the 7 Dots challenge this month.

Thanks so much for dropping in.

Happy Scrappin'!

Heather

Thursday, 24 October 2013

All That Glitters

Hello again,

I'm back with a share - this time it's cards! I had these cards published in last months' edition of Australian Cardmaking, Stamping and Papercraft.


I went all out with the glitter on these. Together with the ruby, black and gold colour combo I think it makes a striking statement. The paper is Bo Bunny Serenade collection, the chippy leaves are from Twiddleybitz and Scrapmatts and the flowers are from Manor House Creations. I used two different American Crafts glitters on the leaves.

Here are close ups of the individual cards:


For full instructions on how to make these cards, grab a copy of last month's Australian Cardmaking, Stamping and Papercraft magazine.

While you're there, take a look at the new edition that just came out - I'm in there too! I've made some Christmas cards with a modern edge to them.

Here are some sneak peeks:


If you're making your own Christmas cards this year I hope you're well into it. Have fun!

Heather

Thursday, 26 September 2013

A Tutorial For You

Well I've been busy creating lately and thought I would share a tutorial with you. This one shows you how to use newspaper on your layouts in a unique way.

I used a sheet of canvas paper for my background. Just like sketchpads, canvas papers are available in pads at art supply places. I find they buckle less when I apply wet mediums to them, although they still curl just as much as standard cardstock. Feel free to use chipboard, cardstock or anything you like. Just be prepared for it to buckle!

Although it looks like there are quite a few steps here, the process is actually pretty simple. And the best news is that there is no right or wrong. If you like it then it's right!

Ok - enough of the preamble. Let's get started!

Step 1
Give your base a light coat of gesso. Don't make it perfect - just a rough slap over will do.

Step 2
While the gesso is still wet, tear up pieces of newspaper and lay them on the gesso. You can cover the whole base or just put in patches, it's up to you. Dry it completely with a heat gun (or wait for it to dry) then start to pull the newspaper off. When you have only the well-stuck sections left, dampen a cloth or a baby wipe and gently wipe the newspaper. You will see that you can remove as much or as little of the newspaper as you like. If you don't remove much then the side of the newsprint facing you will be seen and the text will read the correct way. If you remove the top layer of newspaper then the opposite side of the newspaper will be seen which will be printed in reverse. This creates a very cool look though!


Step 3
Once you get down to selecting which parts to keep try rubbing the newspaper with your finger. This gives you fine control of what you're removing.

Step 4
Once you have finished your background should look something like this. Remember it's up to you how much newspaper you want. Note how the variety of font sizes adds a bit of interest.

Step 5
You can now create whatever you like with your newsprint background. On my layout, I used Distress Inks through a Crafters Workshop stencil to add a coloured layer.

Here's what my background looked like at this stage.

Step 6
I next added some gorgeous papers from Bo-Bunny's new Mama-Razzi 2 range. You can get the range from ScrapEverything here.

I then finished the layout off with lots of Mama-Razzi 2 rub-ons, some Kaisercraft transparencies and journaling. Here's the finished layout:


And some close-ups:


I hope you found this helpful. If you decide to give this a go please drop me a line and let me know. I'd love to see what you make!

Happy scrappin!

Heather


Tuesday, 10 September 2013

Australian Cardmaking, Stamping & Papercraft

Hello there.

I hope you had a great weekend. I did! We had the last official day of our Masters Tour at Werribee on Saturday. They were an awesome bunch of ladies and we had a ball. I'll get some pics together soon. On Sunday I accompanied my die-hard Tigers fan hubby to the footy. There were 95,000 people at the MCG. We didn't win but I still had a blast. What an amazing atmosphere!

To top it off, my copy of Australian Cardmaking, Stamping and Papercraft arrived in the mail today and I've got some cards in it! It's the first time I've submitted cards to a mag and I must say that Emily at ACSP was terrific to deal with.


You can find the website here.

Here are a couple of sneak peeks:


For full instructions on how to make the cards, grab a copy of the mag. It has just been released and should be arriving into the stores any day now.

I hope you can fit in some crafting time soon.

Heather

Friday, 6 September 2013

Family Is.....

Hello everyone.

Were you fortunate enough to be able to spend Fathers' Day with a special dad? I got to spend it with both my hubby and my dad, so I'm doubly lucky! I forgot to take my camera when I visited my dad but luckily I had my phone on hand to record the day. We just had a simple lunch with mum and dad but it made my dad's day.

Of course, when it came time to make a layout for Scrap Everything I had to use this photo! By the way, take a look at Scrap Everything's new blog. Not only does the new design look terrific, Scrap Everything is turning 5 so Katherine's offering 30% off almost everything. This lasts until midnight on Sunday so jump in girls!

I'm using the new 'Family Is' scrapping pack. It's available here. At first I had trouble getting the layout to come together. I was trying to use a busy background paper but every time I tried to add things to it it just looked too cluttered. The paper would be perfect if you want to scrap quickly and just put a photo and an embellishment or two on it. As a Design Team member though, it's my job to do more than this! In the end I ditched the background paper and used plain white cardstock. I could then scrap to my heart's content!

Here's the layout:


The blocks of patterned paper are cut from one of the 12 x 12 papers and I fussy-cut the banner from another one. Yes, that took a bit of time but that's ok - it's fun! I added a few of the buttons. These are soooo easy to use! They are self-adhesive and I'd love to know what adhesive they use cos it's super strong! So it's just a matter of peeling them off and sitting them where you want them. Super easy!

For the background, I sprayed some mist then decorated it with tiny hearts using Sassy Pink Smooch, available here.  I love the applicator tips on Smooch products. They're like a cross between a brush and a felt tipped pen which makes it so easy to create tiny detail. It's perfect for colouring in stamped images.

Here's a close up:


Those cute little chippie banners were included in the button pack and I used the letters from the Combo Stickers sheet to make the word 'Fathers'.

Cheers to all the dads!

Heather

PS - sorry about the black text. I worked out what happened but I can only fix it by re-typing it all. Black text will just have to do for this post!

Friday, 23 August 2013

My Crazy Family

When Katherine from Scrap Everything sent me Bo Bunny's new "Family Is" pack I knew I wouldn't have trouble finding photos to suit it. The theme of the pack is very much about crazy families. My family fits the bill perfectly!

The pack contains papers, chippies and sticker sheets. There are a lot of words in the pack, great if you struggle with journaling.

Here's my layout:


I made the most of the words by running a strip of them down one side of the page. Although I love the background paper I wanted something brighter behind the pics so I attacked it with my gesso and stencil. The only other product on the page that isn't from the Family Is pack is the gorgeous twine on some of the buttons. You can get it here. At $1 for 5 metres it's one of the best value scrapping products you will ever buy.

Here are some closies:


Now if any of you saw my post before this one then you might notice a similarity between the design of the two layouts. This was completely unintentional and I didn't notice it myself until I sat one layout down on my desk next to the other. The weird thing is, I made this layout before I even saw the Scrap Around The World sketch. My Scrap Everything layouts always get posted on a Friday, which is why the other layout went up first on my blog. To make matters worse, I used the same stencil on both layouts. (I tend to do that - if I make something and like it why not do it again?) What I'm trying to say is I didn't scraplift SATW's sketch for this layout! I'm sure this sort of thing must happen all the time but it's the first time it's happened to me.

Happy scrapping everyone.

Heather

Thursday, 21 March 2013

50 Posts and 5,000 Page Views!

I hope you've had a good week everyone.

I was putting up my last post and realised I have put 50 posts on my blog. I can't believe it! Coincidentally  I also just had my 5,000th view so that's got to be some sort of milestone.

I thought I should do something to celebrate. I remembered how I really enjoyed looking through other blogs at the end of last year where people listed their top 10 favourite layouts for the year so I thought I'd do this. I've gone through all my posts and picked out my 10 favourites pages. I can't believe how hard this was! There are layouts that I love because I think they look great but there are others that I love because they record a special memory or have some other significance.

So, without further ado, here they are.

In tenth position:


This was a page that was quick and simple to make and I really love the result. I made it for my Design Team work at Scrap Everything! using the KaiserCraft Secret Admirer Collection. This layout also brings back fantastic memories of Mykonos!

In ninth place:


I love the retro feel of this one and the funny story behind it - when my son was 2 he couldn't blow his candles out because he couldn't blow properly! This layout was published in Scrapbooking Memories Vol 14, No 12.

In eighth spot:


I made this one for my DT application for Manor House Creations. The photo is of my mum when she was a young teen. It's such a stunning photo. I went with the colour purple as it's mum's favourite colour. I really like the unique frame I created with covered wire adorned with flowers.

In seventh place:


I really love this as not only does it look great but it holds all the secrets to my very versatile casserole recipe. I made this for my sister-in-law when she had just had her third child. I figured she needed all the short cuts in the kitchen she could get! For more pics (and the recipe) go to here. It was published in Scrapbook Creations.

In sixth place:


I struggled with which of my Masters' layouts to put up here. I couldn't make 4 out of my 10 favourites layouts from my Masters application! In the end I went with two of them.
I love this one for the stunning photo of my daughter and the acrylic flower frame. My daughter doesn't often let me take 'nice' photos of her but on this occasion she just had her lovely long hair cut short and she loved it so was happy for me to take a pic.

In fifth place is another Masters layout:


The pastel colours really didn't show up well in the mag on this one. I loved the old pics of me and I was really pleased with the multi-layered tags I placed behind each photo. There's a lot on this page so for more info see here

In fourth position:


This gorgeous pic is of my nephew Archie, who has featured in a few of my layouts. I loved experimenting with sprays and stencils on this one. It was published in Scrapbook Creations Issue No 95.

In third place:


Again, I love it when I can get good pics of my daughter! I love the rich colours in this one. Those Bo Bunny papers are just awesome! The black Manor House flowers finished off the page nicely. And just to show how fickle it can be trying to get layouts published, this one wasn't accepted by the mags and it's my third favourite!

In second place:


This is another one I did for Scrap Everything! Although this is a simple page, it really speaks to me. I'm not sure why. I don't even remember where these pics were taken. Somehow it just seems to work.

And finally, here's my number one pick from my first 50 blog posts:


I made this layout a while ago and the products were older ones even then. I still love it though! It was published in Scrapbooking Memories Vol 14, No 10.

Hope you've enjoyed this. I had fun putting it together!

Heather