Showing posts with label Manor House Creations. Show all posts

Sunday, 29 June 2014

One for my Hubby

Hi there,

To all you people enjoying warm weather at the moment, lap it up while you can. It's soooo cold here now!

Anyway, cold weather is perfect for scrapping so I've been hibernating in the scrap room. I had a wonderfully interesting mix of products to use from Scrap Everything and I've had a lot of fun experimenting with them.

Here's what I came up with:


I received a pack of the Manor House Wood Elements - 'Going Places' which is available here. These are very cute wooden words in circles, kind of like flairs. One of them said 'Epic' so I grabbed a photo that I took last week of my husband when he collected a huge mushroom from our paddock. This was the most epic thing we had seen for a while! Last week, I left the wood elements raw on my layout so this week I decided to paint this one. I also outlined the word in black pen then highlighted it in a Zig Wink of Stella clear pen. It's available here.

What's a Wink of Stella pen I hear you ask. That's what I wondered too. It turns out to be a pen that adds a gorgeous shimmer to whatever it writes on. It comes in colours but this one is clear which means I can add a shimmer to anything without changing the colour of the element. I used the pen on the word 'Epic', my arrows, my chevrons and I added a few simple stars around the page.


Do you like the cool arrow? I made that using a Sizzix Tim Holtz chevron die! It's available here. You can do amazing things with this die! In it's most basic form it cuts out negative and positive chevrons. I chose to cut up the negative shape and made the arrow with it. I then cut a yellow paper with the die and filled in the arrow head with a yellow chevron. The black chevrons were also made with the die.

I outlined the black chevrons with the Wink of Stella pen and coloured the orange/yellow arrow with it.

I hope you get to do a bit of hibernating and scrapping this week.

Happy scrappin'!

Heather


Monday, 23 June 2014

Feeling Nostalgic

Hi there,

I'm back with a new layout for Scrap Everything. I used a gorgeous pic I took while holidaying with my family in Mykonos a few years ago and am feeling very nostalgic. What a fabulous place!

Here's my layout:


Aren't those Manor House Creations Wood Elements stunning? The Memories frame is available here and the stamps are available here. I simply left them raw. I love the natural, rustic look this gives the page.


I just cut scraps of paper - nearly all the paper on this layout is Maja paper - to fit the stamps. This is so easy yet very effective.


Scrap Everything are also selling these amazing Tim Holtz framework dies. The one I used here is a chevron but there are other styles available. Framework dies can be used in several ways. They cut both positive and negative shapes and can be linked together to form continuous shapes. In this layout I have used the inside shapes which are standard chevrons. Framework dies are handmade and can cut through paper, material and plastic. The die is available here.


To make the word "Mykonos" I used a stencil to paint it then outlined it in a new Zig Artist Sketching Pen. I love the tip on this - it's perfect for journalling and is available here.


Thanks for dropping in for a look. 

Happy Scrappin'!

Heather

Thursday, 24 October 2013

All That Glitters

Hello again,

I'm back with a share - this time it's cards! I had these cards published in last months' edition of Australian Cardmaking, Stamping and Papercraft.


I went all out with the glitter on these. Together with the ruby, black and gold colour combo I think it makes a striking statement. The paper is Bo Bunny Serenade collection, the chippy leaves are from Twiddleybitz and Scrapmatts and the flowers are from Manor House Creations. I used two different American Crafts glitters on the leaves.

Here are close ups of the individual cards:


For full instructions on how to make these cards, grab a copy of last month's Australian Cardmaking, Stamping and Papercraft magazine.

While you're there, take a look at the new edition that just came out - I'm in there too! I've made some Christmas cards with a modern edge to them.

Here are some sneak peeks:


If you're making your own Christmas cards this year I hope you're well into it. Have fun!

Heather

Monday, 23 September 2013

A Russian Challenge

Hi there.

I hope your week has started well. If it's school holiday time for you then I hope you're getting a few sleep ins!

I was checking out the amazing work of Georgia Heald the other day on her blog and saw she was this month's guest designer for a Russian challenge site called Paperdvizhnik.. Georgia says the site has a lot of arty, mixed media layouts so I thought "this is for me!" This months' challenge is to create a layout using white, grey and two other colours of your choice. Here's what I came up with:


I chose the pink colour to match my daughter's sunglasses and I was inspired by a lovely old K & Company paper to make the second colour that gorgeous yellow-green. The weird thing is that I then hardly used any of the paper!

I had fun creating the background. I used a tried and true Heather technique - if you're not happy with it, gesso over the top and keep going! I first used texture paste through a TCW stencil to create the lines of dots. I then sprayed carefully behind the photo with Dylusions so it would colour some dots pink and not others. I coloured some of the other dots grey with an ink pad and left some white. I then added quite a bit of stamping using grey ink.

I then decided that I wasn't completely happy with the effect so I gessoed over the top of it, leaving some parts partly exposed. I now had a background with depth and texture to work with. The Dylusions softened and blended when it was wet with the gesso and the other colours were toned down. Now, I was happy with it! I then took another TCW stencil (Mayan Calendar - one of my favourites) and used multiple inks to match the colours of the paper. I used mustard seed and crushed olive Distress Inks to make the yellow-green and pink and purple inks to make the pink colour.

You can see the layers here:


I added a chippie, some Manor House Creations flowers and A Lil' Somethin' flair button to finish off the photo:

I made a pair of shades from paper and created the title with some ever-faithful Thickers.


I used another stencil behind the photo - this time a Maya Road one - and added some grey to it.


I finished the page off with some stitching in grey, pink and green and added the leftover threads to the chipboard flourish.

If you're into mixed-media layouts, hop on over to Paperdvizhnik and have a look. I'll keep an eye open to see if you post a layout there!

Cheers,
Heather

Monday, 16 September 2013

White With 1

Hi girls!

I thought I'd have a go at the White With 1 challenge this month. The colour this month is pistachio. This is not a colour I've used much but I'll have a go at anything!

I thought I'd do something different and not use a photo of my kids! These are the heifers we currently have on our farm. Sometimes they come right up to our kitchen just to check out what we're doing. Cows are really intelligent creatures and they definitely get curious about what we do.


To make the title, I used some old puffy letter stickers, placed them where I wanted the title to be then sprayed the area with a Dylusions spray. I then removed the letter stickers and when the spray was completely dry, I outlined the stenciled letters in a thick pen. I also did a little stamping with a white ink just to give the sprayed area a bit more interest.

Here's a close-up. Hmm, that spray looks a bit more like it's real life colour here.


I clustered some Manor House Creations flowers under the photo, twisting the stems to give the impression they are spiraling down the page. I also added twists of pistachio ribbon to reinforce this theme. I used an older gingham ribbon as this always seems quite "country" to me.


I stamped some farm animals from Stampin' Up! along the bottom to add to the farm feel. I usually don't go for this more cutesy style but I felt the simple black and white images added to the page. I sprayed a wooden KaiserCraft tree with white Dylusions to add to this rural feel.


I hope you have a great week!

Heather


Tuesday, 10 September 2013

Australian Cardmaking, Stamping & Papercraft

Hello there.

I hope you had a great weekend. I did! We had the last official day of our Masters Tour at Werribee on Saturday. They were an awesome bunch of ladies and we had a ball. I'll get some pics together soon. On Sunday I accompanied my die-hard Tigers fan hubby to the footy. There were 95,000 people at the MCG. We didn't win but I still had a blast. What an amazing atmosphere!

To top it off, my copy of Australian Cardmaking, Stamping and Papercraft arrived in the mail today and I've got some cards in it! It's the first time I've submitted cards to a mag and I must say that Emily at ACSP was terrific to deal with.


You can find the website here.

Here are a couple of sneak peeks:


For full instructions on how to make the cards, grab a copy of the mag. It has just been released and should be arriving into the stores any day now.

I hope you can fit in some crafting time soon.

Heather

Monday, 2 September 2013

One Of My Faves

I hope everyone's been having a good week so far. We've been getting some gorgeous sunshine here which is wonderful.

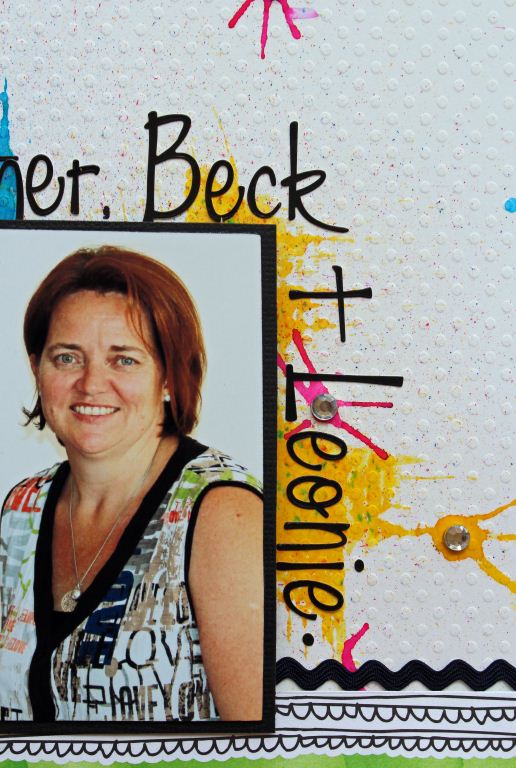
I thought I'd share one of my all-time favourite layouts with you. It was published in Scrapbooking Memories Vol 15, No 12. Here it is:


To create the background on the top portion, I swiped Dylusions behind the photo. I then dropped a few splats around the swipes (highly technical terms here, lol!) then blew the splats through a straw. I then topped them with a rhinestone.

The bottom section is made entirely from Manor House Creations flowers plus some punched leaves. A strip from one of my favourite paper ranges - American Crafts Sketchbook - sits between the sections. I ran ric rac around the edges of the layout which I think looks fab on the layout but makes it almost impossible to crop on the computer!

Here's a close up:

This pic is a wonderful reminder of the first day Leonie, Beck and I met.

In the same mag I had another very floral layout published although this one is in a very different style.


It's a bit hard to see here but this layout is all about the rather good action shots my son took of me sliding down a waterfall. 


And lastly, the Masters Challenge for that month was for Darkroom Door. We had to create something with the Darkroom Door film strip photos that we could use for organising our scrap room. This certainly made us think outside the square! I store my 12 x 12 papers in a cardboard file box so I came up with the idea to use tags to show what each section contained.


I punched a different border along the bottom of each tag and coloured each tag differently. I punched a hole in the centre of the flowers and used a curtain hook to hang the tags from the side of my storage box.

My Workshop Secrets article this month had lots of examples of what I was explaining but no full layouts so there's nothing more to add here, except to say that for those lucky people who found out today that they will be the Masters next year - congratulations! We won't know who they are a for a few months yet but there will be 10 lucky ladies doing happy dances somewhere today!

Happy scrapping!

Heather


Tuesday, 27 August 2013

White With 1

Well I seem to be on an online challenge mission this month. I wasn't planning to do this. Sometimes challenges just catch my eye and that's what I feel like doing at the time.

I decided to enter the White With 1 challenge for the first time this month. The August challenge is to use White + Pastels + Masking. Looking at the DT layouts I can see that stenciling classifies as masking - I've noticed that the words 'stenciling' and 'masking' are often used to mean the same thing in scrapping, much like 'stencil' and 'template'.

Anyway, I was re-organising my flowers stash the other day and I realised that I have a ridiculously large hoard of them. I was thinking about how I could use them up and thought of the idea that I've used on this layout. The pastels theme worked perfectly for it.

Here's my layout. Warning - it's very different for me!


The background papers are old Kaisercraft and The Scrapcake and I gessoed over them. I then got out heaps of flowers, glued them to the page and painted each one with gesso. I also used white Dylusions on some of the flowers that had lots of shape to them as it was hard to get in to all the crevices with a paintbrush. The great thing about the gesso is that it allowed the original colours of the flowers to still slightly show through to create a beautiful soft pastel look.

Here's a close up of the flowers. They bottom layers are horrible old flowers that I will never otherwise use but the top ones are mostly gorgeous Manor House Creations flowers plus some basic flatter ones.


Once I knew where the flowers would sit, I used texture paste through a The Crafters Workshop vine stencil to create the flourishes around the flowers. I coloured the white glitter letters with a Tria Marker and added them to a banner made from the same ribbon that I wrapped around the layout.


To top off the pastel theme, I printed the photo in four pastel colours. I love this effect!

Thanks for looking!

Heather

Saturday, 24 August 2013

My First Once Upon A Sketch Challenge

My goodness I've been a busy little Vegemite lately. (If you're not an Aussie don't even try to attempt to understand that comment - lol!) This is my third post in 4 days. That's a bit of a record for me. Must be cos my hubby's been away so I've got lots of scrapping done!

I thought I'd have my first go at a challenge on Once Upon A Sketch. I'm a journalling kind of gal so their focus on journalling suit me. The journalling theme for August is "I'll never forget" and here's the sketch:


My photo faced the other way so I flipped the sketch vertically.


I used a The Crafters Workshop Stencil on the background - I love the fine detail on this one. The yellow spray is Tattered Angels Glimmer Mist and the flowers and leaves are from Manor House Creations. My niece's hair looks quite gold in this photo which is why I decided to go with the gold theme.

I had fun with the leaves and flowers. I originally had the idea to make a trailing bouquet of flowers but I saw the cream leaves and realised how well these would work with the gold theme. I painted the edges of the leaves with gold paint and cut up pieces of gold ribbon to form the extra leaves. They all trail from the gorgeous gold flowers.

Here's a closeup of the leaves and the journalling:


 Thanks for looking!

Heather

Thursday, 22 August 2013

Scrap Around The World

I found myself with some spare time yesterday so I was at last able to make a layout for this month's Scrap Around The World challenge. I love their challenges. They're always interesting and some great layouts appear every month from scrappers from all over the globe. It's a great way to see some new and creative material.

Here's this month's mood board and sketch:


I recently had a short, but wonderful, tropical holiday so when I saw the orange and red flowers and the greenery on the cake in the mood board I knew this is what I would use for my inspiration.

Here's my layout:


The colours in this layout are quite strong - even hot - but that's exactly the feel I'm trying to portray as the colours in the plants in Port Douglas were amazing - so rich and lush.

For something different I created my leaves from green wire. I made one long vine, growing up from the lowest flower cluster to the highest. The flowers are all from Manor House Creations and the colours worked wonderfully. To make some of the flowers smaller so I had a variety of sizes on the page, I pulled them apart and rolled some of the layers into smaller flowers.


The background is made using a The Crafters Workshop stencil and gesso. Because there were circular elements on the sketch, I continued with that theme by choosing spotted paper and adding the extra spots with the stencil.


Now, as the wind howls around my windows, I can only dream of being back in the warm weather again!

Thanks for looking.

Heather

Thursday, 25 July 2013

Just made it!

Hi all,

I only just realised that this month's challenge at Scrap Around The World closes in 17 hours! I've just scraped this layout in!

You can find this month's challenge here. Here are July's mood board and sketch:


I went to a wedding a couple of months ago and this mood board just yelled "wedding" to me. The pictures on the mood board are gorgeous. I started with the sketch but got this great idea about sitting the photo on a bouquet of flowers so this changed the design significantly. I realised at some stage that I was so far from the sketch that there was no point trying to make it look like it so I just went with the flow.

Here's what I came up with:


I'm not sure I've done the layout justice with this photo. It's a 12 x 12 layout with edges punched with a Martha Stewart border punch. I loved playing around with the gorgeous Manor House Creations flowers to make the bouquet. I think the all-white theme is so elegant. I added lace around the photo and in the bouquet to highlight the gorgeous lace wedding dress. I added my jounaling in silver pen unobtrusively around the photo as I wanted to keep the design simple and uncluttered.

Here are some close ups:


Thanks for looking!

Heather

Monday, 1 July 2013

Exciting News!

Oh hello everyone! I'm thrilled and honoured to be asked to be a Guest Design Team member for The Scrapbook Store. Suzanne and Marelize are such wonderful ladies and their design team has some of my all-time favourite scrappers ever, so I'm thrilled to be working with them for the month of July.

I thought I'd start with the monthly sketch challenge. Here's the sketch:


I had some pics of my daughter wearing steampunk clothes to her year 12 formal which I wanted to use. I really admire my daughter for her unusual tastes in clothes and the way she's not afraid to get out there and wear them. I figured there mustn't be too many teenagers who can figure out how to wear steampunk to a formal event. I think she pulled it off beautifully!

Even though the sketch is quite soft and pretty I figures I could adapt it. I flipped it vertically and dropped the top circular element as my page was getting quite heavy visually. There was a cluttered background in my pics so I photoshopped the background out completely. The blank background on the new photos allowed me to have a fairly busy page as the photos stood out quite clearly.

Here's my layout:


The background is made from the leftovers of other backgrounds. I was using Dylusions ink sprays through a The Crafters Workshop stencil for some other projects and every time I finished, I flipped the stencil over and stamped it onto cardstock. I did this a number of times onto the same cardstock and the result is this background.


I also used Dylusions to colour the chipboard and the flowers. I used to spend ages hand-painting chipboard until I discovered Dylsusions! The Scrapbook Store sells a whole range of Dylusions ink sprays here and The Crafters Workshop stencils here.


I attacked my stash from a class I did with Finnabair and found all those yummy screws and cogs. They're perfect for this page! I added some small Manor House Creations flowers along the bottom, colouring them with Dylusions.


To lighten and brighten the page, I added the bright pink flowers. I love the juxtaposition of this splash of girliness against the steampunk setting but my daughter doesn't like it. She's the steampunk expert and she thinks the pink flowers shouldn't be there. This raised a whole new issue - who do I make pages like this for? Are they for me or the people they're about? Should they contain what I like or what they like? I haven't been able to answer this question yet but the flowers are still there!

Hope to see you over at The Scrapbook Store soon!

Heather