Monday 28 December 2015

A Dusty Photo Shoot

Hello! I hope you're having a wonderful holiday break.Today I want to show you how you can make cool backgrounds with Dusty Attic stencils and chippies plus I have a few other tips and tricks to share.

Here's the layout I made:


I love those poppies!

To make the background, I first swiped behind the photo with gesso then dabbed Dusty Attic paint through a feathers stencil, changing to a green ink every now and then. I then took a leaf chippie, held it with jewellery pliers and dabbed it in black paint. I then stamped the leaf above and beneath my photo, re-applying the paint each time. Using chippies as stamps is a great way to extend the use of your products.


Did you see the heart below the photo? That's actually a waste piece from the Fancy Flourish #2 set. Always look at the pieces you remove from chippies and see if there's anything useful in the waste!


I also used some Metallic Melts on the second word of the title, half of the large heart and the heart on the arrow. This adds a bit of funky glam to the page. Try adding it to just half or a part of a shape for a unique feature.


That Heart Attack panel is great. By popping out the inner hearts you can get three different heart designs from the one panel.

Here are the Dusty Attic products I used:

Leaves #2 DA1342              Poppies DA1289          Mini Captions #7 DA1386   


Heart Attack Panel small #1    Feathers and Arrows Stencil     Fancy Flourish #2
DA1203                                     DA1327                                       DA0415


Heart Arrows #1 DA1016       Foliage #3   Dusty in Colour Paints in Oceania, Jungle green and Soot


Happy scrappin'!

Heather 

Thursday 24 December 2015

Going For Gold!

Ho Ho Ho! I'd like to wish you all a very wonderful Christmas and a happy and creative 2016! Thank you to all my lovely followers who have stuck with me through some very busy patches when I wasn't able to comment on your amazing work. I've loved checking out what each and every one of you have created over the year. It's been amazing!

Today, I have a very Christmassy layout to share. The Dusty Attic girls were asked to create something for Scrap Around The World for their very last challenge.


Here's the stunning mood board at SATW:


As much as I adore this pink and gold combo, I didn't want much pink in the layout cos my son is in the photo so I just used it subtly.


I've gone for a gold on gold look with most of the chippies.


I painted some parts of the Pendants white to make them stand out. These are so drop-dead gorgeous!


I used a combination of Dusty Attic paints and ink to create the watercolour effect on the title.

Here are the Dusty Attic chippies I used:

Lace Border #3 DA1344

Ornate Pendants DA1359

Ornate Pendants #3 DA1366

Wrought Iron Design Set DA0574

Mini Words #1 DA0386

Don't forget that the very last Scrap Around The World challenge closes on December 31st. It would be great if you could join in one last time! You can find the challenge here.


Happy scrappin'!


Heather


Sunday 20 December 2015

A Scrappy Chat Designs Card

Hello scrappy friends! Today I have a card to share for Scrappy Chat Designs. Yes, we don't always just make layouts! I've made this card using the absolutely gorgeous Enchanted Garden kit. This kit contains some yummy papers, cardstock, a full-sized stencil, Shimmerz Creameez, funky flowers, twine and more!

Here's my card:


You'll never guess how I made those gold flecks! Head over to the Scrappy Chat Designs blog HERE for a full tutorial and to find out my little secret!


Are you a Scrappy Chat member yet? If not, here are the details:
Joining Scrappy Chat Designs is like doing 3 classes each month - all in the comfort of your own home!

Each premier kit comes with:
Video AND instructions to complete the three layouts and feature many techniques with product to be used well after the life of the kit. (With all of our kits you will have plenty of product and knowledge to add to future projects)
Photos of each project including close up detail pictures.
All the product needed to complete the project with a list of additional basic items used such as ink/ paints/gesso/texture paste and colour sprays you will need out of your supplies.
The kits focus on how to use various products teamed up with some pretty paper to compliment them, so there is always less or non-consumable products in our kits, to not only help you complete some beautiful projects, learn many techniques and ways of using the different product as well as taking them well beyond the kit projects.
Kits are $39 + postage and come out monthly. Please e-mail us at orders.scrappychatdesigns@gmail.com if you would like to order this kit

For more kits and other products visit our website www.scrappychatdesigns.com.au

Scrappy Chat Designs Kit club Membership (e-mail us to purchase):
This lasts for 3 months is $135 and includes 3 kits at 5% off and postage for all 3 kits (they are released monthly). As a member you also get ‘insider’ info on what is coming up in the next kit – sometimes even a pic! You get additional 'Technique sheets' showing you more techniques you can nail with the product in the kit from the talented Arty Chic's. You are also guaranteed the kits which do sometimes sell out VERY quickly. If you are interested in membership, you need to pay the membership fee by the 30th of the month prior.

Just email for this deal orders.scrappychatdesigns@gmail.com 


Happy scrappin'!


Heather

Wednesday 16 December 2015

Using Up Leftover Sprays

Hello! Today I'm sharing my last Off The Rails post. I have enjoyed my time on the OTR team but a new year brings new adventures. I'd like to thank Amanda Sousa so much for having me on board.

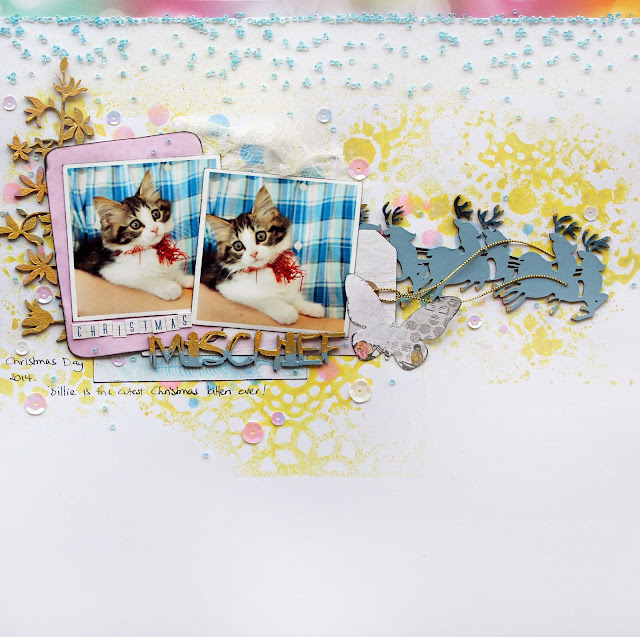
Today I want to show you how you can use up leftover sprays. Firstly, here's my layout:


This is my niece's gorgeous kitten, Billie, who has since turned into an equally gorgeous cat. Any kitten that happily spends Christmas Day wearing tinsel has to have character!


Here's how I used my leftover spray.....


Whenever you spray through a stencil, keep a sheet of white (or coordinating coloured) cardstock nearby. After spraying, flip the stencil over and stamp it onto the cardstock. I have only used one colour and stencil here but you can use multiple colours and multiple stencils on the one cardstock for easy and unique backgrounds.

Here's how I then created my layout.....
Sponge pink and blue ink through a Dusty Attic stencil.


Paint the chippie pieces.


Mount chippies, paper and photos onto the page.


Tuck some gauze behind the photo, add a tag and thread and the first part of the title.


Add a strip of paper at the top and glue a line of beads underneath. Glue scattered beads in place. Add the chippie title, a butterfly and sequins for a bit more Christmas bling. Don't forget to add your journalling!


Here are some closeups.....


Here's the stunning mood board that I used for this project. I hope you can join in this month!


Happy scrappin'!


Heather McMahon

Sunday 13 December 2015

Dusty in December

Hello Dusty friends! I'm back with you today with my layout for The Dusty Attic  for December. Before I show you, did you know that you can win a $100 Dusty Attic voucher? Wouldn't that come in handy at this time of year? All you have to do is enter this month's challenge and be the winner!

Here's what I made:


I used the inspiration board in several ways. Firstly, here it is:


Isn't it beautiful? I used the word Bliss on my layout and took my cues for my photo choice from the cosy, relaxing scene. I started off using only the colours from the inspiration board, but I'm a teal fan and I just couldn't help adding a bit, then a bit more!

That long wriggly piece behind the photo is a waste piece! Never throw out any interesting shapes - you never know when they will come in handy!


I layered up the background with Dusty Attic texture paste, some Dusty Attic stencils and, of course, Dusty Attic paint! I added some Magicals for extra pow. I've used Tinby Designs Metallic Melts on the frame, words, squiggly waste piece and hearts. I love this effect! 

Do you like the frame? - that's my own design! I love the funkiness of it.


Don't you just love these little hearts? They come in a pack of a mix of shapes and are fantastic value. You can use them on just about any project.


The triangles were made using a Dusty attic stencil that was made specifically for the escape2create retreat last year. I use it a lot!


The Dusty Attic products I used are:

Winged Frame Set DA 1343

waste piece from Lacy Border #3 DA 1344

Mini Hearts #2 DA 0990

Bookman ABC Set DA 0666

Mini ABC Set Lower DA 0862

Fan Stencil DA 1320

Texture Paste DA 1218

Dusty Attic paints in Oceania, Bisque, Pesto and Cranberry.

And of course, my ever-faithful....
Clear Gloss varnish DA 0901
(I use this to glue everything!)


Happy scrappin'!

Heather