Tuesday 27 August 2013

White With 1

Well I seem to be on an online challenge mission this month. I wasn't planning to do this. Sometimes challenges just catch my eye and that's what I feel like doing at the time.

I decided to enter the White With 1 challenge for the first time this month. The August challenge is to use White + Pastels + Masking. Looking at the DT layouts I can see that stenciling classifies as masking - I've noticed that the words 'stenciling' and 'masking' are often used to mean the same thing in scrapping, much like 'stencil' and 'template'.

Anyway, I was re-organising my flowers stash the other day and I realised that I have a ridiculously large hoard of them. I was thinking about how I could use them up and thought of the idea that I've used on this layout. The pastels theme worked perfectly for it.

Here's my layout. Warning - it's very different for me!


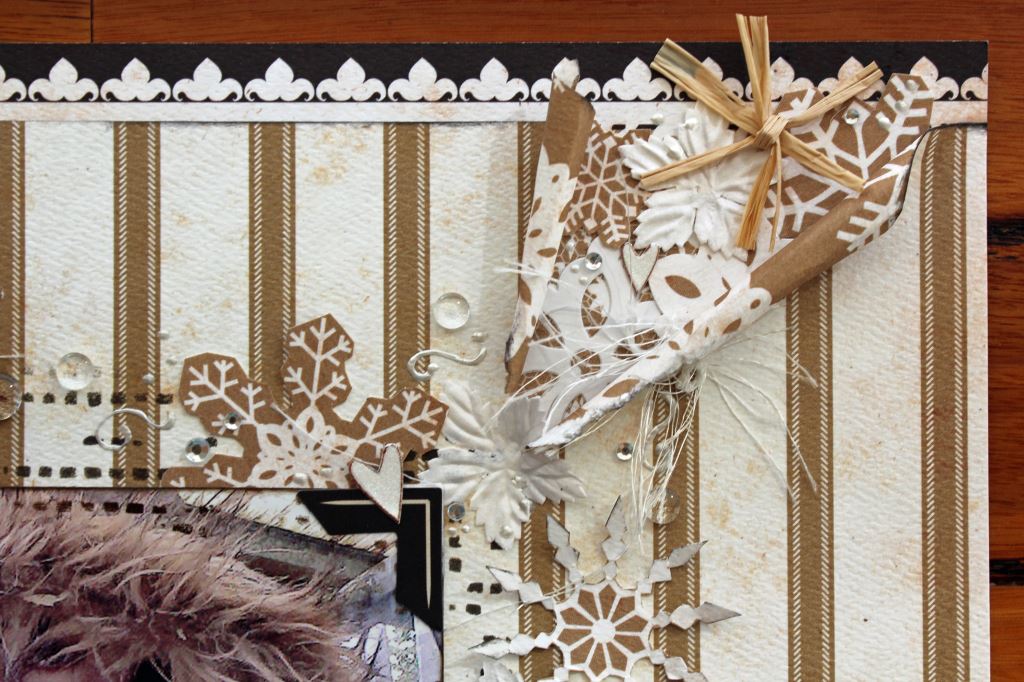
The background papers are old Kaisercraft and The Scrapcake and I gessoed over them. I then got out heaps of flowers, glued them to the page and painted each one with gesso. I also used white Dylusions on some of the flowers that had lots of shape to them as it was hard to get in to all the crevices with a paintbrush. The great thing about the gesso is that it allowed the original colours of the flowers to still slightly show through to create a beautiful soft pastel look.

Here's a close up of the flowers. They bottom layers are horrible old flowers that I will never otherwise use but the top ones are mostly gorgeous Manor House Creations flowers plus some basic flatter ones.


Once I knew where the flowers would sit, I used texture paste through a The Crafters Workshop vine stencil to create the flourishes around the flowers. I coloured the white glitter letters with a Tria Marker and added them to a banner made from the same ribbon that I wrapped around the layout.


To top off the pastel theme, I printed the photo in four pastel colours. I love this effect!

Thanks for looking!

Heather

Saturday 24 August 2013

My First Once Upon A Sketch Challenge

My goodness I've been a busy little Vegemite lately. (If you're not an Aussie don't even try to attempt to understand that comment - lol!) This is my third post in 4 days. That's a bit of a record for me. Must be cos my hubby's been away so I've got lots of scrapping done!

I thought I'd have my first go at a challenge on Once Upon A Sketch. I'm a journalling kind of gal so their focus on journalling suit me. The journalling theme for August is "I'll never forget" and here's the sketch:


My photo faced the other way so I flipped the sketch vertically.


I used a The Crafters Workshop Stencil on the background - I love the fine detail on this one. The yellow spray is Tattered Angels Glimmer Mist and the flowers and leaves are from Manor House Creations. My niece's hair looks quite gold in this photo which is why I decided to go with the gold theme.

I had fun with the leaves and flowers. I originally had the idea to make a trailing bouquet of flowers but I saw the cream leaves and realised how well these would work with the gold theme. I painted the edges of the leaves with gold paint and cut up pieces of gold ribbon to form the extra leaves. They all trail from the gorgeous gold flowers.

Here's a closeup of the leaves and the journalling:


 Thanks for looking!

Heather

Friday 23 August 2013

My Crazy Family

When Katherine from Scrap Everything sent me Bo Bunny's new "Family Is" pack I knew I wouldn't have trouble finding photos to suit it. The theme of the pack is very much about crazy families. My family fits the bill perfectly!

The pack contains papers, chippies and sticker sheets. There are a lot of words in the pack, great if you struggle with journaling.

Here's my layout:


I made the most of the words by running a strip of them down one side of the page. Although I love the background paper I wanted something brighter behind the pics so I attacked it with my gesso and stencil. The only other product on the page that isn't from the Family Is pack is the gorgeous twine on some of the buttons. You can get it here. At $1 for 5 metres it's one of the best value scrapping products you will ever buy.

Here are some closies:


Now if any of you saw my post before this one then you might notice a similarity between the design of the two layouts. This was completely unintentional and I didn't notice it myself until I sat one layout down on my desk next to the other. The weird thing is, I made this layout before I even saw the Scrap Around The World sketch. My Scrap Everything layouts always get posted on a Friday, which is why the other layout went up first on my blog. To make matters worse, I used the same stencil on both layouts. (I tend to do that - if I make something and like it why not do it again?) What I'm trying to say is I didn't scraplift SATW's sketch for this layout! I'm sure this sort of thing must happen all the time but it's the first time it's happened to me.

Happy scrapping everyone.

Heather

Thursday 22 August 2013

Scrap Around The World

I found myself with some spare time yesterday so I was at last able to make a layout for this month's Scrap Around The World challenge. I love their challenges. They're always interesting and some great layouts appear every month from scrappers from all over the globe. It's a great way to see some new and creative material.

Here's this month's mood board and sketch:


I recently had a short, but wonderful, tropical holiday so when I saw the orange and red flowers and the greenery on the cake in the mood board I knew this is what I would use for my inspiration.

Here's my layout:


The colours in this layout are quite strong - even hot - but that's exactly the feel I'm trying to portray as the colours in the plants in Port Douglas were amazing - so rich and lush.

For something different I created my leaves from green wire. I made one long vine, growing up from the lowest flower cluster to the highest. The flowers are all from Manor House Creations and the colours worked wonderfully. To make some of the flowers smaller so I had a variety of sizes on the page, I pulled them apart and rolled some of the layers into smaller flowers.


The background is made using a The Crafters Workshop stencil and gesso. Because there were circular elements on the sketch, I continued with that theme by choosing spotted paper and adding the extra spots with the stencil.


Now, as the wind howls around my windows, I can only dream of being back in the warm weather again!

Thanks for looking.

Heather

Saturday 17 August 2013

Snowy Secrets

Hi all,

Wow! What a wild week we've had weather-wise. Our local town was in chaos yesterday as power lines came down, buildings were damaged and traffic lights were out due to wild winds lashing the area. There weren't enough police to man all the intersections so motorists and pedestrians were taking their lives into their own hands just trying to cross the road.

The winter weather was on my mind when I put together my Workshop Secretes article for Scrapbooking Memories Magazine, Vol 15, No 11. I wrote about how to use snowflakes on a page. Snowflakes are so versatile - if you regularly use flowers on layouts then you'll have no problem with snowflakes as they work in a very similar way.

My first layout was completely inspired by the whole snowflake/crystal theme and I went with a transparent background onto which I stitched rows of falling snowflakes. I love the effect but it proved very difficult to photograph! To be honest though, I reckon I did a better job than the magazine photographers as they placed it on a white background which ruined the effect completely.

Here's my photo of the layout:


I made a giant snowflake from paper, painted it and decorated it with anything that gave an icy impression. I then added some smaller flakes and attached the lot to my stitched transparency background.

Here's a close-up - this time taken on a flat timbered surface.


My second layout featured my gorgeous niece rugged up against the wild winter in Europe a few years ago. The pic was only a small one sent from her phone but I think that sometimes the impression a photo gives can be more important than it being perfect quality.


Although the layout looks like there are snowflakes falling all over it, only a few of those embellies are actually snowflakes. The rest just give the impression of snowflakes. There are various flowers, liquid pearl dots and swirls, knotted rafia, rhinestones, hearts, fibres and clear pebbles.

Here are some close ups so you can see what I mean:


I tore the page in the top right corner so it looks like the snowflakes are pouring out if there.


I hope you're keeping warm inside and finding some scrapping time!

Cheers,
Heather

Friday 9 August 2013

Woohoo! Victorian Masters Tour - Day One

Hi all,

Sorry it's been a while since my last post - I've been a busy little Vegemite!

Part of the reason for my tardiness in posting is that we had the first day of our Masters Tour last Saturday. It was held at the Kasercraft Outlet at Geelong. What a day! I'm not sure who had the most fun- the students or the teachers!

Here are a few pics:

No sad faces in our classes!

Leonie showing how it's done. A bit more concentrating happening here!

 Prizewinners - gotta love freebies!


Hard at work - note Leonie posting pics on our Tour facebook page in the background. Nothing like a real time post!

Kaisercraft were amazing - they put on a bbq lunch for everyone and supplied delicious home-made goodies to keep our energy and sustenance up! I think the other stores on the tour had better start baking today as we now have very high expectations! Just joking Ballarat and Werribee!


We have had wonderful reports back from the ladies who came to the day which makes it all the more special for us. Thanks for being such a great group girls!

For anyone who's still thinking about joining us, the Ballarat day is on the 24th of August and the Werribee day is on the 7th of September. There are still some places left at Ballarat but we're almost full at Werribee. Drop me a line if you would like any more info or take a look at our blog http://vicmasterstour.blogspot.com.au/

Cheers,
Heather

Friday 2 August 2013

Loving the Retro Look...

Hi there,

I'm here today with my latest layout for Scrap Everything! I based the layout around those gorgeously retro We R Memory Keepers cardstock cards, available here. There is a real variety of them, some with plain colours, some with patterns and some with wonderful retro pictures and sayings.

Here's my layout:


The only thing as gorgeous as those cards is my nephew! He has a thing about playing with the balls on our pool table. The funny thing is, he can barely reach - he has to stand on tiptoes to play with them!

The paper on the outside halves is Webster's Pages Plum Tree. I simply cut a 12 x 12 sheet in half, rounded the corners and added some old lace. The trim at the top and bottom of the layout is a genuine 1960's ricrac from my stash that matched the papers perfectly. The strip at the bottom of the page is Prima Wishes and Dreams washi tape. Running a strip of it along here not only helped to balance the layout but helped to hold down the lace too. Still in that bottom corner, I added some more of the cardstock cards plus a camera chippie from Fabscraps. It comes in a set with chippie binoculars too. I sprayed it with white Dylusions and added a button in the middle.

Here's a close up:


For the title I used one of the larger cardstock cards, added a few embellies, and wrapped it all up in Maya Road twine.


Included in my kit was a bottle of Glue 'n Seal. As the name says, it's both a glue and a sealer. It comes in a bottle with a brush - I felt like I was back in kindergarten using the Clag! I liked the way it was slow drying as this is great when you're trying to place embellishments. It gives you a chance to moves things around a bit. I found the brush a bit big for small, fiddly items but it seemed to work well on the things I used it on. I will try it out on more items and get back to you.

I used two different styles or wording above some of the pics. I took appropriate words from the washi, adhered them to cardstock and cut out the shapes. I could have stuck them straight onto the card beneath but it would have shown the pattern beneath a bit and it's a bit tricky to cut sticky washi (try saying that three times quickly!)


For the other text, I used a fabulous set of mini stamps from Kaisercraft. I can see myself using these a lot. They'd be perfect for cards as well as layouts.


And just because he's so cute - here's Archie again!


Bye for now!

Heather